DIY Apache Spark Clusters in Azure Cloud
Getting Apache Spark clusters in Azure cloud is not as easy as it can be, also its not as difficult as you might have originally thought.
This post is about getting you started to a DIY step-by-step guide to getting an Apache Spark environment ready to work with. I assume that you, the reader, is familiar with the Linux OS or macOS and is capable of performing command terminal commands without much issues.
Disclaimer: This is NOT a setup i would put to a production environment and its a quick and canonical way to get started.
Deployment Target
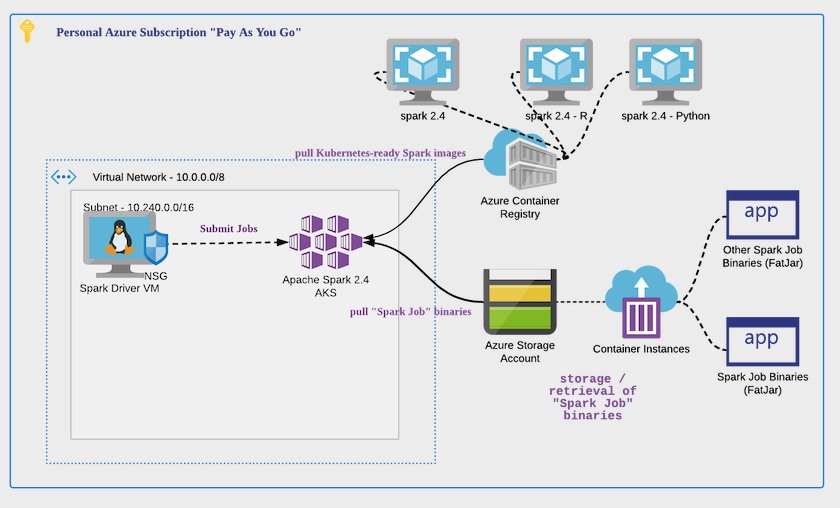
The diagram illustrates how i would like my design to be deployed.

Step-By-Step Guide
We are going to use the Azure CLI shell (which works on Windows,Linux,macOS) and you can download it here.
1. Login to Azure
This assumes that you have a valid Azure subscription. In this scenario,i am working with the “Pay As You Go” subscription model provided by Azure.
az login
2. Create a Resource Group
az group create –name sparkcluster –location southeastasia
3. Create a Azure Service Principal
az ad sp create-for-rbac –name SparkSP
Note: Take note of the appId and password values from the response; you’ll need them later.
4. Create VNET and SUBNET; Assign Proper Roles
Designing the address space is very important in any deployment scenario; since you don’t want to run into the scenario where your Kubernetes Pods or Nodes run out IP addresses. The last thing you want to happen is to rebuild the entire infrastructure.
After the VNET and Subnets have been created, its necessary to assign Azure roles to the application so that it can utilize these newly created subnets and vnets. You can read about Azure role assignment to understand how they work.
az network vnet create \
     --resource-group sparkcluster\
     --name myAKSvnet\
     --address-prefixes 10.0.0.0/8 \
     --subnet-name myAKSsubnet \
     --subnet-prefix 10.240.0.0/16
Let’s put the IDs of the vnet and subnet into local environment variables so that we can reuse them
later and create the role assignment.
Note: Replace the $APP_ID with the appId’s value after the creation of the Azure Service Principal.
VNET_ID=$(az network vnet show --resource-group sparkcluster --name myAKSvnet --query id -o tsv)
SUBNET_ID=$(az network vnet subnet show --resource-group sparkcluster --vnet-name myAKSvnet --name myAKSsubnet --query id -o tsv)
az role assignment create --assignee $APP_ID --scope $VNET_ID --role Contributor
5. Azure Container Registry
The ACR is a managed cloud level service which allows me to store and retrieve Docker images which will run in the AKS’s pods. If you have already have a container registry you like to re-use, skip to Section 7.
RESOURCE_GROUP=sparkcluster
MYACR=rtcontainerregistry

# Run the following line to create an Azure Container Registry if you do not already have one
az acr create -n $MYACR -g $RESOURCE_GROUP --sku basic
Upon completion of the command, you need to navigate to the ACR page on the Azure portal and make sure the details of the creation is as you expected.
6. Build and Push Apache Spark 2.4 Binaries to the ACR
You have 2 options when it comes to building and pushing the Kubernetes-enabled Apache Spark images to the ACR:
- You can pick a valid
2.4Apache Spark release from the downloads page or you can clone the repository and build it. - Regardless of the release, you can build and push from your local machine
- Regardless of the release, you can build and push from a VM or anywhere that is able to push to the ACR you’ve created or wanting to re-use.
Regardless of where you are building the Apache Spark binaries, you would need a local installation of Docker installed so that the temporaries generated can be deposited there.
Special note: If you are using a linux OS and you are building Apache Spark locally on this OS , then here’re the instructions to get docker installed before you push.
curl -fsSL https://get.docker.com -o get-docker.sh
sudo sh get-docker.sh
sudo usermod -aG docker $USER
Back to business …
# my ACR's name is "rtcontainerregistry" and for the FQDN to valid and resolvable, you add a suffix "azure.cr.io"
MYACR=rtcontainerregistry
REGISTRY_NAME=rtcontainerregistry.azurecr.io
REGISTRY_TAG=v1

# Login to ACR before you push the Apache Spark images
az acr login --name $MYACR

# Assuming you are cloning Spark from source
git clone -b branch-2.4 https://github.com/apache/spark
cd spark
./bin/docker-image-tool.sh -r $REGISTRY_NAME -t $REGISTRY_TAG build
./bin/docker-image-tool.sh -r $REGISTRY_NAME -t $REGISTRY_TAG push
Caveat: When pushing to the ACR, you should make sure your internet connection should be fast and stable; else its going to make you very very sad.
The push refers to repository [rtcontainerregistry.azurecr.io/spark]
f87149a534ef: Pushed
8d13bd6f40dd: Pushed
bf136682448c: Pushed
2acb4de1d621: Pushed
b797c7e289f1: Pushed
1cf861754e59: Pushed
ad39af8df6d8: Pushing [>                                                  ]
3.245MB/189.8MB
b5055cc36e13: Pushing [==================================================>]
24.54MB
fed847ee665d: Pushing [============>                                      ]
52.34MB/206.6MB
b3d0cd2ee037: Pushed
0a71386e5425: Pushed
ffc9b21953f4: Pushing [===============>                                   ]
21.67MB/69.21MB
....
You should make sure that the binaries are safely uploaded into ACR by a visual inspection, if necessary.
7. Azure Kubernetes Service
Now, we are ready to create the AKS and there’s a fair bit to understand about the command i’m using,
remember to replace $SERVICE_PRINCIPAL with the appId and $CLIENT_SECRET with password.
az aks create \
  --resource-group sparkcluster \
  --name sparkAKScluster \
  --node-count 3 \
  --network-plugin kubenet \
  --service-cidr 10.0.0.0/16 \
  --dns-service-ip 10.0.0.10 \
  --pod-cidr 192.168.0.0/16 \
  --docker-bridge-address 172.17.0.1/16 \
  --vnet-subnet-id $SUBNET_ID \
  --service-principal $SERVICE_PRINCIPAL \
  --client-secret $CLIENT_SECRET \
  --generate-ssh-keys \
  --attach-acr rtcontainerregistry
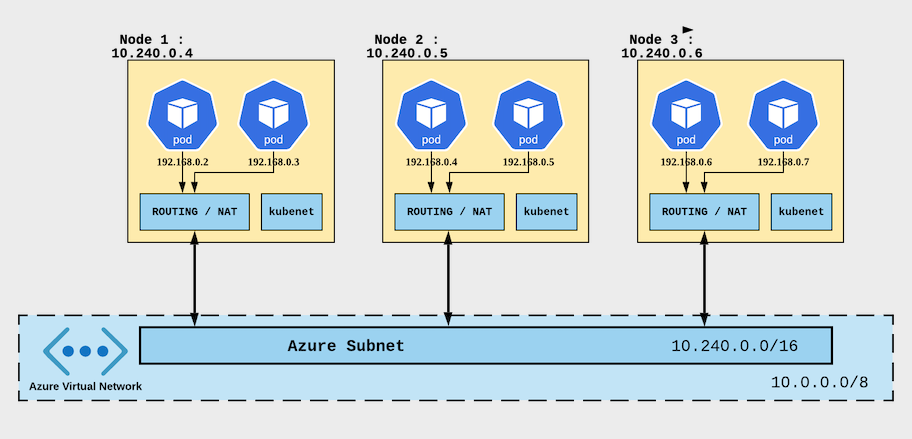
What i am doing here is essentially to tell Azure that i wish to create a AKS cluster of 3 nodes and i like Azure to house them into the given subnet and vnet; also i’ve also instructed Azure the Ip addressing scheme of my Kubernetes Pods and Nodes.
To understand a little more about how CIDR’s are being assigned to the pods, its useful to have this diagram in
mind:

Note: I’m using a dns service and you need to be careful about the restrictions of DNS services in Azure. the TLDR version is that the DNS’s service’s last octet must end with “.10”.
8. Launch a Spark Shell to the AKS cluster
To launch the spark-shell so that you can interact with the running Apache Spark AKS cluster, its very
important to remember that the driver VM must be in the same subnet so that its visible.
Provision a VM into the same subnet and vnet as the AKS cluster
Launch the following command :
az vm create \
  --name sparkClientVM \
  --resource-group sparkcluster \
  --image ubuntults \
  --vnet-name myAKSvnet \
  --subnet myAKSsubnet \
  --generate-ssh-keys \
  --admin-user donkey \
  --admin-password 'password123'
A public IP address will be available for you to SSH into the the private IP addres will be assigned
automatically from the subnet configuration provide (i.e. it would be somewhere in the 10.240.0.0/16 range).
Access the sparkClientVM using the credentials as indicated and you should use a strong password;
via SSH e.g. ssh donkey@<sparkClientVM IP>.
Provision the VM with the dependencies
Inside the driver VM, you would install to install the Java runtime or Java development kit (depends on whether
you wish to just run applications or build them as well). In my case, i was using this VM to compile and build
applications for testing purposes. You are free to replace openjdk-8-jdk with openjdk-8-jre if you just
want to run Java apps.
sudo apt update
sudo apt upgrade
sudo apt install openjdk-8-jdk -y
wget http://mirrors.ibiblio.org/apache/spark/spark-2.4.6/spark-2.4.6-bin-hadoop2.7.tgz
tar -xzvf spark-2.4.6-bin-hadoop2.7.tgz
sudo mv spark-2.4.6-bin-hadoop2.7 /opt/spark
I find it convenient to store commonly used environment variables into the bash resource file for this user.
export JAVA_HOME=/usr/lib/jvm/java-8-openjdk-amd64
export SPARK_HOME=/opt/spark
export PATH=$SPARK_HOME/bin:$PATH
Assign Role to permit pulling of images from ACR
For the driver VM to be able to command the Kubernetes server to provision, launch shell and jobs you need to install the Azure cli, followed by authorising this VM to be able pull images from ACR.
curl -sL https://aka.ms/InstallAzureCLIDeb | sudo bash
az login --use-device-code
CLIENT_ID=$(az aks show --resource-group sparkcluster --name sparkAKScluster --query "servicePrincipalProfile.clientId" --output tsv)
ACR_ID=$(az acr show --name rtcontainerregistry --resource-group sparkcluster --query "id" --output tsv)
az role assignment create --assignee $CLIENT_ID --role acrpull --scope $ACR_ID
Associate the new AKS cluster with Kubectl
Now that the role assignment has been completed, you need to install kubectl which allows you to interact with
the AKS, using these instructions:
curl -LO https://storage.googleapis.com/kubernetes-release/release/$(curl -s
https://storage.googleapis.com/kubernetes-release/release/stable.txt)/bin/linux/amd64/kubectl
chmod +x ./kubectl
sudo mv ./kubectl /usr/local/bin/kubectl

# Populate the $HOME/.kube/config file
az aks get-credentials --resource-group sparkcluster --name sparkAKScluster
Note: The next time you use kubectl, it would be reading the $HOME/.kube/config to know which cluster to interact with.
Add RBAC permissions to AKS
This step allows the Kubernetes-enabled Spark images to be able to communicate properly with the AKS, otherwise you will run into authorization problems.
kubectl create serviceaccount spark
kubectl create clusterrolebinding spark-role --clusterrole=edit --serviceaccount=default:spark --namespace=default
Discover the AKS
You would need the master url (i.e. The ENV variable SPARK_K8S_MASTER of the Apache Spark cluster so that all jobs can know where to submit
kubectl cluster-info
The response looks something like :
Kubernetes master is running at https://sparkakscl-sparkcluster-bbebd2-4c4683bf.hcp.southeastasia.azmk8s.io:443 CoreDNS is running at https://sparkakscl-sparkcluster-bbebd2-4c4683bf.hcp.southeastasia.azmk8s.io:443/api/v1/namespaces/kube-system/services/kube-dns:dns/proxy kubernetes-dashboard is running at https://sparkakscl-sparkcluster-bbebd2-4c4683bf.hcp.southeastasia.azmk8s.io:443/api/v1/namespaces/kube-system/services/kubernetes-dashboard/proxy Metrics-server is running at https://sparkakscl-sparkcluster-bbebd2-4c4683bf.hcp.southeastasia.azmk8s.io:443/api/v1/namespaces/kube-system/services/https:metrics-server:/proxy
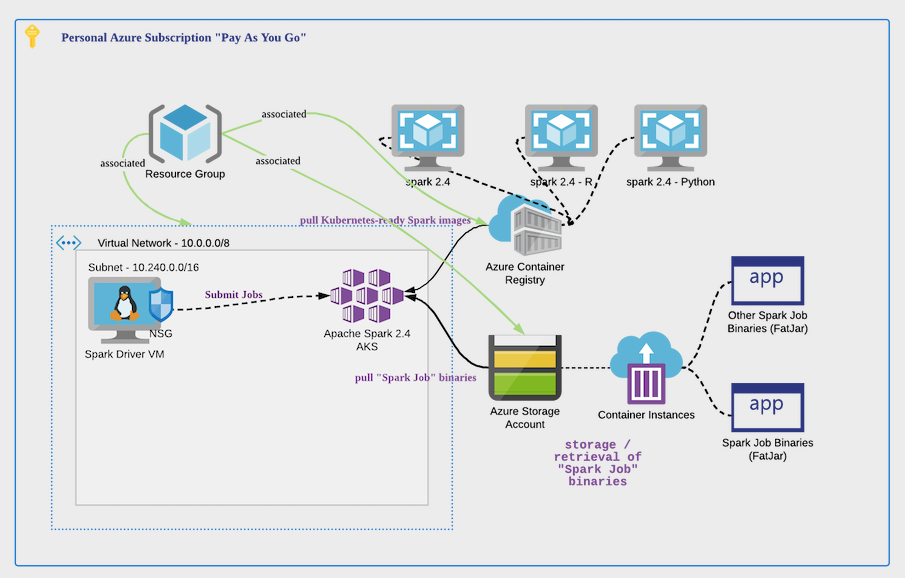
At this point in time, all of the resources are grouped into a single Azure Resource Group.

Launch Interactive Session
After all that is done, we are ready to launch an interactive session with AKS Spark cluster.
Place the contents of the following into a shell script runSparkShell.sh and run it via bash runSparkShell.sh
#!/bin/bash

spark-shell \
  --master k8s://$SPARK_K8S_MASTER\
  --deploy-mode client \
  --conf spark.driver.host=10.240.0.7 \
  --conf spark.driver.port=7778 \
  --conf spark.kubernetes.container.image=rtcontainerregistry.azurecr.io/spark:v1 \
  --conf spark.kubernetes.authenticate.driver.serviceAccountName=spark
A sample response looks like this:
donkey@sparkClientVM:/opt/spark$ spark-shell --master
k8s://https://sparkakscl-sparkcluster-bbebd2-4c4683bf.hcp.southeastasia.azmk8s.io:443
--deploy-mode client --conf spark.driver.host=10.240.0.7 --conf
spark.driver.port=7778 --conf
spark.kubernetes.container.image=rtcontainerregistry.azurecr.io/spark:v1 --conf
spark.kubernetes.authenticate.driver.serviceAccountName=spark
20/07/01 06:24:54 WARN NativeCodeLoader: Unable to load native-hadoop library
for your platform... using builtin-java classes where applicable
Using Spark's default log4j profile: org/apache/spark/log4j-defaults.properties
Setting default log level to "WARN".
To adjust logging level use sc.setLogLevel(newLevel). For SparkR, use
setLogLevel(newLevel).
Spark context Web UI available at http://10.240.0.7:4040
Spark context available as 'sc' (master =
k8s://https://sparkakscl-sparkcluster-bbebd2-59f29f3a.hcp.southeastasia.azmk8s.io:443,
app id = spark-application-1593584706719).
Spark session available as 'spark'.
Welcome to
     ____              __
    / __/__  ___ _____/ /__
    _\ \/ _ \/ _ `/ __/  '_/
    /___/ .__/\_,_/_/ /_/\_\   version 2.4.6
    /_/

    Using Scala version 2.11.12 (OpenJDK 64-Bit Server VM,
    Java 1.8.0_252)
    Type in expressions to have them evaluated.
    Type :help for more information.

    scala>
9. Launch a Spark Job to the AKS cluster
There are two options opened to you, when it comes to submits jobs to the AKS cluster.
9.1 Launch referencing to Spark job libraries locally
As your projects are going to different from mine and from everyone else’s so the more probable thing for me to demonstrate is how it works from a simple example. You can customize the approach i’ve shown here to suit your needs.
In the following example, i am using the pre-built example binaries found in every Apache Spark release.
Note: Replace the value of SPARK_K8S_MASTER with the value of the kubernetes master from the response. See
kubectl cluster-info.
spark-submit \
  --master k8s://$SPARK_K8S_MASTER\
  --deploy-mode cluster\
  --name spark-pi\
  --class org.apache.spark.examples.SparkPi\
  --conf spark.executor.instances=3\
  --conf spark.kubernetes.container.image=rtcontainerregistry.azurecr.io/spark:v1\
  --conf spark.kubernetes.authenticate.driver.serviceAccountName=spark\
  local:///opt/spark/./examples/jars/spark-examples_2.11-2.4.6.jar
9.2 Launch referencing to Spark job libraries in Azure Blob Storage
In this approach, i’m going to use the same pre-build binaries found in the Apache Spark release and upload
the blob to the Azure blob storage, capture the URI to these blob and feed it to the job submission (i.e. spark-submit).
Here’s how to deposit the blob to cloud storage.
# Assume that you have login to Azure
RESOURCE_GROUP=sparkcluster
STORAGE_ACCT=rtsparkexamples
az storage account create --resource-group $RESOURCE_GROUP --name $STORAGE_ACCT --sku Standard_LRS

# This environment variable is a must-have
export AZURE_STORAGE_CONNECTION_STRING=`az storage account show-connection-string --resource-group $RESOURCE_GROUP --name $STORAGE_ACCT -o tsv`

CONTAINER_NAME=rtsparkexamplejars
BLOB_NAME=spark-examples_2.11-2.4.6.jar
FILE_TO_UPLOAD=./examples/jars/spark-examples_2.11-2.4.6.jar

echo "Creating the container..."
az storage container create --name $CONTAINER_NAME
az storage container set-permission --name $CONTAINER_NAME --public-access blob

echo "Uploading the file..."
az storage blob upload --container-name $CONTAINER_NAME --file $FILE_TO_UPLOAD --name $BLOB_NAME
jarUrl=$(az storage blob url --container-name $CONTAINER_NAME --name $BLOB_NAME | tr -d '"')
Now, let’s submit a Spark job to the cluster. Remember to replace the value of SPARK_K8S_MASTER with the
value from kubectl cluster-info.
export RESOURCE_GROUP=sparkcluster
export STORAGE_ACCT=rtsparkexamples
export CONTAINER_NAME=rtsparkexamplejars
export BLOB_NAME=spark-examples_2.11-2.4.6.jar
export AZURE_STORAGE_CONNECTION_STRING=`az storage account show-connection-string --resource-group $RESOURCE_GROUP --name $STORAGE_ACCT -o tsv`
export jarUrl=$(az storage blob url --container-name $CONTAINER_NAME --name $BLOB_NAME | tr -d '"')

spark-submit \
  --master k8s://$SPARK_K8S_MASTER\
  --deploy-mode cluster\
  --name spark-pi\
  --class org.apache.spark.examples.SparkPi\
  --conf spark.executor.instances=3\
  --conf spark.kubernetes.container.image=rtcontainerregistry.azurecr.io/spark:v1\
  --conf spark.kubernetes.authenticate.driver.serviceAccountName=spark\
  $jarUrl
Alright then, signing off for now. Have fun!
References
The following are good reading resources to understand more about Kubernetes, Apache Spark Clusters and Cloud deployment strategies, best practices etc.
- Use kubenet networking with your own IP address ranges in Azure Kubernetes Service (AKS)
- Network concepts for applications in Azure Kubernetes Service (AKS)
- Moving resources to new Resource Group
- Move operation support for resources
- Assign permissions to groups, using the principle of least privilege
- Apache Spark Cluster Overview
- Deploy Spark to Kubernetes